
Planting
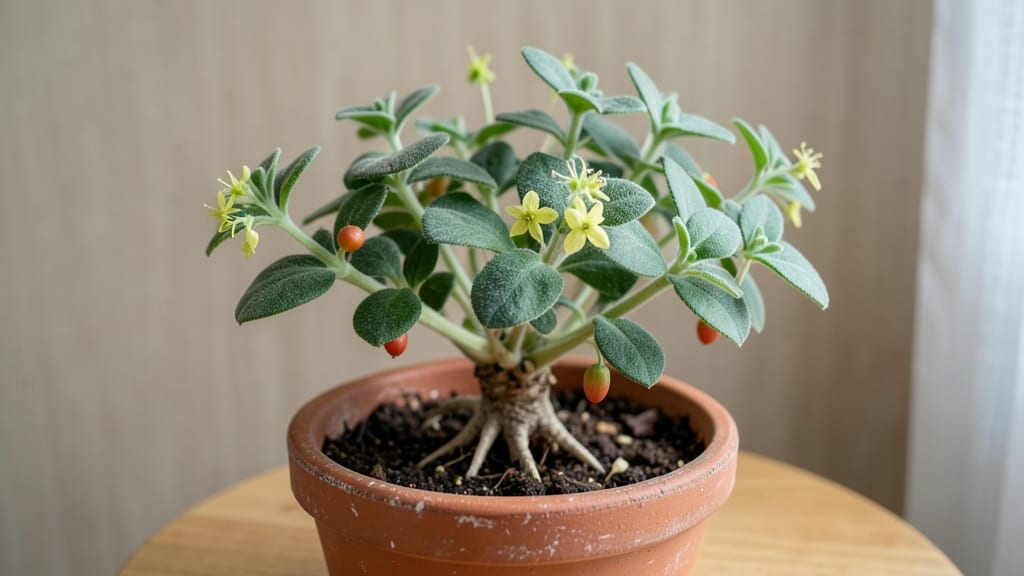
Growing an ashwagandha plant in pot transforms your windowsill into a tiny apothecary of calm. 🌿 This ancient adaptogen thrives indoors with minimal fuss, its deep green leaves whispering promises of stress relief right from your kitchen counter.
The secret lies in mimicking its native dry, well-drained conditions—something even black thumbs can nail with just a few adjustments.
Start with a 6-inch pot (ashwagandha hates soggy roots) filled with cactus or succulent mix—add a third perlite for extra drainage. Place it where it gets 4-6 hours of bright, indirect light (south or west-facing windows work best), then water only when the top inch feels bone-dry.
Overwatering is the #1 killer, but don’t stress—this plant’s drought tolerance makes it nearly impossible to murder.
Within 6-8 weeks, you’ll spot those signature velvety, lobed leaves and maybe even tiny yellow flowers—proof your plant’s happy. The roots develop a fleshy, carrot-like structure (that’s where the magic compounds hide), and the aroma?
Earthy, slightly sweet, like a forest after rain. Harvest leaves anytime by snipping the top pairs, and the plant keeps growing.
Troubleshooting is simple: yellow leaves mean overwatering (let it dry out), brown edges mean too much sun (move it back), and pests? Wipe leaves with soapy water once. By winter, your ashwagandha will be a thriving, stress-busting green machine—no greenhouse required. Ready to grow your own calm?
📚 In This Guide
- What you need
- Instructions
- Tips and common mistakes
- Wrapping up and next steps
What you need
- ● Ashwagandha seeds or cuttings: 3–5 seeds (or a single healthy cutting with 2–3 nodes). Choose organic seeds for best results!
- ● Pot: 1 medium-sized pot (10–12 inches deep) with drainage holes. Terracotta or ceramic works great!
- ● Well-draining potting mix: 1 bag (5–10 quarts) of a blend like cactus/succulent mix or regular potting soil amended with 20–30% perlite or sand.
- ● Gravel or pebbles: A small handful for the pot’s drainage layer (1–2 inches at the bottom).
- ● Watering can or spray bottle: For gentle hydration—avoid overwatering!
- ● Garden gloves – Protect your hands from soil and thorns.
- ● Fertilizer – A balanced organic liquid fertilizer (e.g., fish emulsion) or compost tea for nutrient boosts.
- ● Grow lights – If natural light is limited, a full-spectrum LED (12–14 hours/day) keeps your plant happy.
- ● Humidity tray or pebble tray – Ashwagandha loves moderate humidity (40–60%).
- ● Pruning shears – For trimming leggy growth or harvesting leaves.
Step-by-Step guide to growing ashwagandha in pots
This adaptable herb thrives indoors with minimal fuss—here’s how to coax its medicinal roots to flourish.
🌱 Step 1: Select the Right Pot and Soil Mix
Ashwagandha prefers well-draining soil to prevent root rot, so choose a 6-8 inch diameter pot with drainage holes. I use a mix of 50% cactus/succulent soil and 50% perlite to ensure aeration—this mimics its native arid conditions. Fill the pot to 1 inch below the rim, leaving space for watering.
Tap the pot gently to settle the soil without compacting it. The surface should feel firm but still allow water to penetrate easily. If your mix feels too dense, add a handful of orchid bark for extra airflow. Ashwagandha roots are delicate, so avoid heavy garden soil, which retains too much moisture.
🌿 Step 2: Plant Seeds or Transplants Correctly
For seeds, sow ¼ inch deep and space them 2 inches apart—they germinate best in warmth (75-80°F). Cover lightly with soil, then mist gently until the surface is damp. If using a transplant, bury it to the same depth it was in its nursery pot. I’ve found that rooting hormone speeds up establishment if you’re worried about shock.
Place the pot in a bright, indirect light spot (like an east-facing window) until germination. Seeds typically sprout in 10-14 days, but don’t overwater—keep the soil slightly moist but never soggy. Once seedlings appear, remove any weak or leggy ones to leave the strongest plant per pot.
☀️ Step 3: Master Light and Watering for Healthy Growth
Ashwagandha needs 4-6 hours of direct sunlight daily, but too much scorches its leaves. A south or west window works best, or supplement with a grow light 6 inches above the plant for 12-14 hours/day. You’ll know it’s happy when leaves stay deep green and slightly waxy—yellowing means too much water, while pale stems signal insufficient light.
Water only when the top inch of soil feels dry, which for me is about once every 7-10 days in winter and every 5-7 days in summer. Stick your finger in the soil—if it’s damp past your first knuckle, wait another day. Overwatering is the #1 killer of potted ashwagandha, so err on the dry side.
✂️ Step 4: Prune and Fertilize for Strong Roots
Pinch back the tips of new growth when stems reach 4-6 inches tall to encourage bushier, more productive plants. I also remove any yellow or damaged leaves immediately—they drain energy from root development. Ashwagandha doesn’t need heavy feeding, but a balanced liquid fertilizer (10-10-10) diluted to half-strength every 6-8 weeks keeps it thriving.
Here’s the thing—ashwagandha’s medicinal value comes from its roots, so avoid disturbing them. If you’re growing for harvest, let the plant mature for at least 6 months before digging. Smaller roots (under ½ inch thick) are best for teas or tinctures, while thicker roots take longer to develop.
🪴 Step 5: Overwinter and Maintain Year-Round
In winter, ashwagandha enters a dormant phase—reduce watering to every 2-3 weeks and move it to a cooler (60-65°F) spot. Prune back any leggy growth to focus energy on root development. I’ve kept my plants alive through winters by covering the pot with a layer of mulch (like orchid bark) to insulate roots.
Check for pests monthly—ashwagandha rarely attracts them, but aphids or spider mites can appear if the air is too dry. Wipe leaves with a soapy water cloth if needed. With proper care, your potted ashwagandha can live for years, producing fresh roots and leaves season after season.
Tips & tricks for thriving ashwagandha in pots
Between us, ashwagandha's success starts with understanding its native desert habits—here's how to translate that to your indoor setup.
Soil Aeration Secret: The 50/50 cactus soil and perlite mix in Step 1 isn't just about drainage—it's about creating tiny air pockets that mimic ashwagandha's arid homeland. After filling your pot, I recommend adding a thin layer of orchid bark on top before planting. This creates an extra insulating barrier that prevents soil compaction and maintains that crucial airflow right at the root zone. The bark also helps regulate moisture evaporation, which is especially helpful if you tend to overwater like I used to.
Germination Environment: Those 75-80°F germination temperatures in Step 2 might seem tricky to maintain indoors, but I've found a simple workaround: place your seed pot on top of a seedling heat mat set to low. If you don't have one, try placing it on a sunny windowsill during the day and moving it to a warm spot (like near your fridge's bottom) at night. The key is consistency—ashwagandha seeds need stable warmth to break dormancy. I've seen germination rates jump from 50% to nearly 90% when maintaining this temperature range.
Light Transition Strategy: Moving from bright indirect light to direct sunlight in Step 3 can shock tender seedlings. I recommend a gradual transition: start with just 1-2 hours of morning sun per day, then increase by 30 minutes every 3 days until reaching the full 4-6 hours. Watch for leaves that develop a reddish tint—this is your plant's way of saying "slow down!" Ashwagandha's leaves will naturally adjust their chlorophyll production as they acclimate to more intense light.
Winter Care Pro Tip: During the dormant winter phase in Step 5, I've discovered that ashwagandha actually benefits from slightly cooler nighttime temperatures. If your home stays above 65°F at night, try moving the plant to a cooler room overnight (like a basement with a window). This temperature fluctuation mimics natural seasonal changes and can actually improve root development. Just be sure to bring it back to its warmer daytime spot by morning.
Pro Tips for Ashwagandha Plant In Pot
- Between us, ashwagandha's success starts with understanding its native desert habits—here's how to translate that to ...
- Soil Aeration Secret: The 50/50 cactus soil and perlite mix in Step 1 isn't just about drainage—it's about creating t...
- Germination Environment: Those 75-80°F germination temperatures in Step 2 might seem tricky to maintain indoors, but ...
Frequently asked questions
Got questions about growing ashwagandha in a pot? You’re not alone! Here are answers to the most common queries—from beginners to seasoned plant parents.
How often should I water my potted ashwagandha?
Water your ashwagandha when the top 1-2 inches of soil feel dry. Overwatering is the #1 killer—stick to every 5-7 days in warm weather, but reduce to every 10-14 days in winter. Use a pot with drainage holes to prevent root rot.
When will my ashwagandha plant produce roots or leaves?
Patience is key! Seedlings may take 2-4 weeks to sprout, and leaves appear within 4-8 weeks. For roots (like the medicinal variety), wait 3-6 months—they’ll grow thicker and woody with time. Keep it in bright, indirect light to speed things up.
Can I grow ashwagandha indoors without sunlight?
Yes, but you’ll need a grow light (12-14 hours/day). Ashwagandha thrives in bright, indirect light—a south-facing window works if it’s sunny. If using artificial light, place the pot 6-12 inches from the bulb.
Why are my ashwagandha leaves turning yellow?
Yellow leaves usually mean overwatering or poor drainage. Let the soil dry out completely between waterings, and check for root rot (smelly, mushy roots). If the pot lacks drainage, repot with fresh, well-draining soil. →
What’s a good alternative if ashwagandha is hard to find?
Try holy basil (tulsi) or gotu kola—both are easy-to-grow adaptogens with similar benefits. For a milder taste, stevia is another great pot herb. Just match their light and water needs!
Wrapping up and next steps
Growing ashwagandha in a pot is a rewarding way to bring nature’s calming power into your home—literally! 🌱 With the right care, this adaptogenic herb thrives indoors, offering stress relief while adding a touch of green to your space.
Whether you’re a beginner or seasoned plant parent, this guide gave you the tools to nurture a healthy plant.
Ready to take the next step? Start with a single pot and experiment with different soil mixes or light conditions. Over time, you might even harvest your own leaves for tea or supplements—because who doesn’t love a homegrown remedy? 💚