
Planting
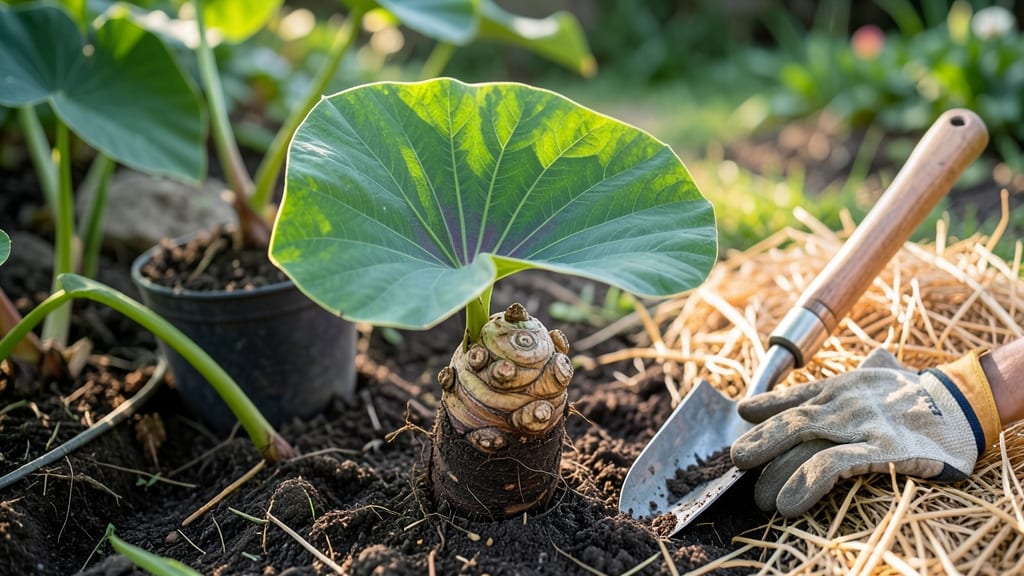
Planting elephant ears in the ground transforms your shady corners into a tropical paradise. 🌿 These bold, heart-shaped leaves thrive when you mimic their natural swampy habitat—rich soil, consistent moisture, and partial shade.
I’ve planted them for years, and the secret lies in proper tuber placement and water management, which I’ll walk you through step by step.
The key supplies are simple: elephant ear tubers (not seeds), a shovel, compost, and mulch. Choose a spot with 4-6 hours of morning sun and afternoon shade—too much direct sun scorches those stunning leaves.
Amend heavy clay soil with compost to improve drainage, since soggy roots are just as deadly as dry ones. Space tubers 2-3 feet apart for mature plants, or closer for smaller varieties.
Planting is straightforward but critical: place tubers 4-6 inches deep, with the "eye" (growth point) facing upward. Water thoroughly after planting, then keep soil moist—not soggy—throughout the growing season. Within weeks, you’ll see those iconic leaves emerging, and by summer, your garden will feel like a lush jungle retreat.
For tropical climates, elephant ears are perennial and will return year after year. In cooler zones, dig up tubers before frost and store them in peat moss or coconut coir.
The biggest mistake? Overwatering or planting too deep—both stunt growth. With the right care, these plants reward you with 5-foot-tall foliage that’s the envy of the neighborhood.
📚 In This Guide
- What you need
- Instructions
- Tips and common mistakes
- Wrapping up and next steps
What you need
- ● Elephant ear tubers – 1–3 tubers per plant (choose Colocasia or Alocasia varieties based on your climate).
- ● Well-draining potting mix or garden soil – 5–10 gallons per planting hole (amend with compost for richer soil).
- ● Organic mulch – 2–3 inches of shredded bark, straw, or leaves (to retain moisture and regulate temperature).
- ● Slow-release fertilizer – 1–2 tbsp per hole (look for a balanced 10-10-10 or a plant-specific formula).
- ● Watering can or hose with a gentle spray nozzle – For deep, even hydration.
- ● Garden trowel or shovel – For digging holes (6–8 inches deep and twice as wide as the tuber).
- ● Gloves – Heavy-duty gardening gloves (tubers can be slimy!).
- ○ Pruning shears – Optional, for trimming dead foliage post-planting.
- ● Measuring tape or ruler – To ensure proper spacing (18–24 inches apart for mature plants).
- ● A sunny to partially shaded spot (6+ hours of sunlight for tropical varieties, partial shade in hot climates).
- ● Warm soil – Wait until after the last frost (soil temp should be at least 60°F/15°C).
- ● Drainage check – Avoid low-lying areas where water pools (elephant ears hate soggy roots!).
Step-by-step instructions for planting elephant ears in the ground
Here's how I plant these striking tropical beauties—no guesswork, just bold results.
🌱 Step 1: Choose the Right Tubers and Prepare the Planting Site
Elephant ears thrive when planted in well-draining soil with plenty of organic matter. I select tubers that are firm and free of soft spots or mold—these are the ones that will produce the most vibrant foliage. For 4 plants, choose tubers that are roughly 4-6 inches in diameter, as larger tubers yield bigger, more dramatic leaves.
Choose a location that receives full sun to partial shade—at least 6 hours of sunlight daily. While they can tolerate some shade, especially in hotter climates, they’ll grow their most spectacular leaves in bright light. Amend the soil with 2-3 inches of compost and work it into the top 12 inches of soil to improve drainage and fertility. Elephant ears hate soggy roots, so avoid low-lying areas where water pools.
🪴 Step 2: Plant the Tubers Correctly for Strong Growth
Dig a hole that’s 2-3 times wider than the tuber and 6-8 inches deep. The key here is to plant the tuber horizontally, not vertically, with the "eyes" or growth nodes facing upward. I like to place the tuber so that the top is just 2 inches below the soil surface—this ensures the tuber stays cool and moist while allowing the shoots to emerge easily.
Space the tubers 4-5 feet apart to give each plant room to spread its massive leaves without competing for nutrients. If you’re planting in a row, make sure the spacing matches the mature size of the variety—some dwarf varieties can get by with 3 feet of space, while giant types need the full 5 feet. Fill the hole with soil and gently firm it around the tuber to eliminate air pockets.
💧 Step 3: Water Deeply and Mulch for Moisture Retention
After planting, water the area deeply until the soil is 6-8 inches moist. You’ll know it’s right when water drains through the bottom of the hole without pooling. Overwatering at this stage can cause the tubers to rot, so let the top 2 inches of soil dry out between waterings once the plants are established. I use a soaker hose for this step—it delivers water slowly and evenly without disturbing the soil.
Apply a 2-3 inch layer of mulch around the base of the plants, keeping it 6 inches away from the tuber itself to prevent rot. Organic mulch like shredded bark or straw helps retain moisture and regulates soil temperature, which is especially important in hot climates. Replenish the mulch as it breaks down throughout the growing season to maintain its protective benefits.
☀️ Step 4: Monitor Growth and Adjust Care as Needed
Shoots will emerge in 2-4 weeks, depending on soil temperature—warmer soil speeds up germination. Once the first true leaves appear, you’ll notice them unfurling like massive, velvety hands. At this stage, increase watering slightly to support rapid growth, but avoid letting the soil stay soggy. Elephant ears are heavy feeders, so I fertilize with a balanced 10-10-10 or 20-20-20 fertilizer every 4-6 weeks during the growing season to keep the foliage vibrant.
If you notice the leaves yellowing or wilting, it’s often a sign of underwatering or poor drainage. On the other hand, if the leaves develop brown edges, you might be overwatering or using tap water high in chlorine or salts. In either case, adjust your watering schedule and check the soil moisture before reacting. Elephant ears are forgiving but do best when their care is consistent and tailored to their needs.
⏰ Step 5: Prepare for Winter Dormancy and Future Plantings
As temperatures drop below 40°F in fall, the foliage will die back naturally. Once the leaves turn brown and crispy, cut them back to the ground, but leave the tubers in the soil—they’ll go dormant and survive winter in most climates. In colder regions where temperatures dip below 20°F, I dig up the tubers, brush off excess soil, and store them in a cool, dry place (like a garage or basement) wrapped in peat moss or vermiculite until spring.
When spring arrives and the soil warms to 60°F, replant the tubers following the same steps. Over time, you’ll notice your elephant ears multiply—each tuber can produce multiple shoots, and you can divide them in early spring to expand your garden. This is one of the easiest perennials to propagate, and before you know it, you’ll have a stunning display of bold foliage that turns heads all summer long.
Tips & tricks for planting elephant ears with confidence
Here's what I've learned after years of growing these dramatic tropical plants—simple secrets that make all the difference.
Tuber Selection: Look for tubers with multiple "eyes" or growth nodes—the more you see, the more shoots you'll get. I've found that tubers with 3-5 eyes will produce 4-6 plants each, giving you more bang for your buck. Avoid tubers with cracks or soft spots, as these often indicate rot or disease that can spread to your entire garden.
Soil Temperature Matters: The 60°F soil temperature mentioned for spring replanting is your magic number—this is when tubers wake up from dormancy. If you're planting in early spring and your soil is still cold, wait until nighttime temperatures consistently stay above 50°F before planting. Cold soil slows germination dramatically, which is why shoots might take longer than the 2-4 week window mentioned.
Mulch Placement Precision: That 6-inch gap between mulch and the tuber isn't arbitrary—it's crucial for preventing rot. I've seen many gardeners accidentally smother their tubers with mulch, which traps moisture and creates the perfect conditions for fungal growth. Use a ruler to measure this distance, especially if you're using thick mulch like wood chips.
Winter Care Shortcut: For gardeners in marginal climates (where temps dip below 20°F but not consistently), you can take a middle-ground approach: mound 12-18 inches of straw or leaves over the planting area in late fall. This provides insulation without requiring you to dig up tubers, and many will survive winter just fine in the ground with this protection.
Pro Tips for Plant Elephant Ears In The Ground
- Here's what I've learned after years of growing these dramatic tropical plants—simple secrets that make all the diffe...
- Tuber Selection: Look for tubers with multiple "eyes" or growth nodes—the more you see, the more shoots you'll get. I...
- Soil Temperature Matters: The 60°F soil temperature mentioned for spring replanting is your magic number—this is when...
Frequently asked questions
Got questions about planting and growing elephant ears? You’re not alone! Here are answers to the most common queries to help you cultivate these show-stopping plants with confidence.
When is the best time to plant elephant ears?
Plant elephant ears in spring after the last frost when soil temperatures reach at least 60°F (15°C). In warmer climates (zones 8–11), you can also plant in early fall for winter interest. Avoid planting in cold soil—the tubers can rot if temperatures dip below 50°F (10°C).
How often should I water elephant ears?
Keep soil consistently moist but not soggy, especially during the first growing season. Water deeply 1–2 times per week (more in extreme heat). Once established, they tolerate slight drought but may droop if thirsty. Mulch around the base to retain moisture and regulate soil temperature.
Can elephant ears survive winter in cold climates?
In USDA zones 7 and colder, dig up tubers in fall before frost, trim foliage, and store them in dry peat moss or vermiculite at 40–50°F (4–10°C) over winter. Replant in spring. In zones 8–11, mulch heavily with straw or leaves for protection.
Why are my elephant ears’ leaves turning yellow or brown?
Yellowing leaves often signal overwatering or poor drainage. Brown edges or crispy foliage usually mean underwatering or heat stress. Check soil moisture and adjust care. Pests like slugs can also cause damage—apply organic slug bait if needed. Ensure tubers aren’t planted too deep (they rot easily).
Are there dwarf or compact varieties of elephant ears?
Yes! If space is limited, try ‘Purple Bush’ (Colocasia) or ‘Black Stem’ (Alocasia), which stay under 3 feet tall. For even smaller options, ‘Moonlight’ (Colocasia) reaches just 2–3 feet with stunning variegated leaves. Always check plant tags for mature size.
Wrapping up and next steps
Planting elephant ears is a rewarding way to add dramatic, tropical flair to your garden with minimal effort!
By following these steps—choosing the right tubers, prepping your soil, and giving them plenty of space and sunlight—you’ll be well on your way to lush, bold foliage that thrives all summer long. 🌿✨
Now that you’re ready to plant, why not take the next step? Explore companion plants that pair beautifully with elephant ears, or dive into care tips to keep your garden flourishing. Happy planting—your garden’s new star is waiting for you! 🌟