
Planting
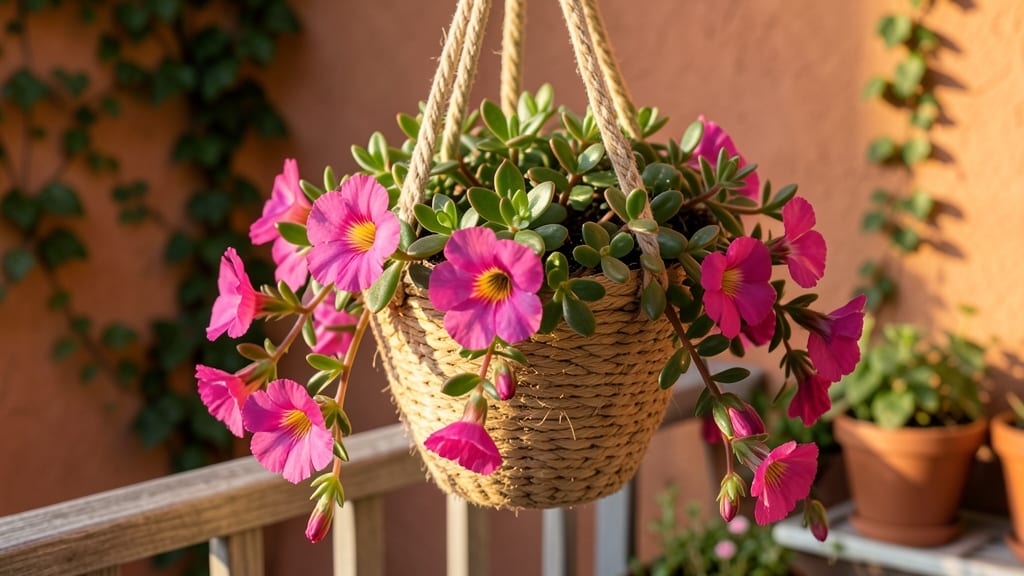
Growing purslane in hanging planters turns your balcony into a lush, edible green machine. 🌿 This succulent, trailing plant thrives in containers, producing tender shoots perfect for salads and garnishes while adding vibrant texture to any space.
The secret lies in its love of heat, minimal water, and bright light—ideal for urban or small-space gardeners.
Start with a well-draining hanging planter (10–12 inches deep) filled with a mix of potting soil and perlite to prevent root rot. Purslane’s trailing stems can reach 2–3 feet, so choose a spot with full sun (6+ hours daily).
Water only when the top inch of soil feels dry—overwatering is the fastest way to kill this drought-tolerant plant.
Prune regularly to encourage bushier growth and harvest leaves from the tips to keep the plant productive. The more you pick, the more it produces—ideal for continuous salads. Watch for aphids (wipe them off with soapy water) and powdery mildew (improve airflow by thinning stems).
By mid-summer, your hanging purslane will be a self-sustaining edible waterfall, offering fresh greens straight from your balcony. The key? Heat, light, and patience—it rewards both your garden and your plate. Ready to grow yours?
📚 In This Guide
- What you need
- Instructions
- Tips and common mistakes
- Wrapping up and next steps
What you need
- ● Purslane plants or seeds: Start with live plants (2-4 cuttings or seedlings) for quicker results, or organic seeds (1-2 tbsp) if you prefer growing from scratch.
- ● Hanging planter: Choose a 10-12 inch diameter container with drainage holes (fabric grow bags or ceramic pots work well).
- ● Potting mix: Use a well-draining, nutrient-rich blend (e.g., 60% coco coir, 30% perlite, 10% compost). Avoid heavy garden soil.
- ● Slow-release fertilizer: Opt for a balanced, organic fertilizer (5-5-5 or 10-10-10 NPK ratio) to nourish your plants.
- ● Pruning shears or scissors: For trimming stems (sterilize with rubbing alcohol).
- ● Watering can or spray bottle: Purslane prefers consistent moisture but hates soggy roots.
- ○ Support stakes or trellis (optional): If your purslane grows leggy, add a small bamboo stake for vertical support.
- ○ pH test kit (optional): Ensure soil pH is 6.0–7.0 (purslane thrives in slightly acidic to neutral soil).
- ○ Mulch (optional): Use straw or shredded leaves to retain moisture and suppress weeds.
- ● Sunlight: Place your hanging planter in a spot with full sun (6+ hours daily) or bright indirect light (e.g., a south-facing window or patio).
- ● Temperature: Ideal range is 50–85°F (10–30°C). Avoid frost—purslane is tender and not frost-resistant.
- ● Watering routine: Keep soil evenly moist but not waterlogged. Mist leaves in dry climates to prevent bolting.
Step-by-step guide to growing purslane in hanging containers
Here’s how I transform this succulent-leafed edible into a thriving, harvestable hanging plant—no green thumb required.
🪴 Step 1: Select the Right Hanging Container and Soil Mix
Choose a fabric grow bag or plastic hanging basket with at least 6-inch depth—purslane’s shallow roots need room to spread but hate soggy conditions. I opt for containers with multiple drainage holes to prevent root rot, especially since purslane thrives in well-draining soil. Mix 2 parts potting soil with 1 part perlite or coarse sand to mimic its native desert-like conditions. This blend ensures excess water drains quickly while retaining enough moisture for tender leaves.
Fill the container ¾ full with your mix, leaving space for plants to root without toppling. Tap the sides gently to settle the soil—this prevents air pockets that could trap moisture. If using a fabric bag, line it with landscape fabric to slow drainage slightly; purslane tolerates dryness but shouldn’t dry out completely between waterings.
🌱 Step 2: Plant Purslane Cuttings or Seeds at the Right Depth
For fastest results, use 4-inch cuttings from a healthy purslane plant—snip just below a leaf node where roots will sprout. Dip the cut end in rooting hormone (optional but helpful) and insert 2 inches deep into the soil. Space 3-4 cuttings per 12-inch container, arranging them evenly around the edges so they trail gracefully. Press lightly to secure but don’t compact the soil, or you’ll smother emerging roots.
If starting from seeds, scatter them ¼ inch deep across the soil surface—purslane seeds are tiny, so I sprinkle them in a thin layer and barely cover with extra mix. Water gently until the soil is evenly moist but not saturated. Place the container in a shady spot for 7-10 days until seedlings emerge; purslane seeds germinate best in warmth (70-75°F) but need indirect light to prevent legginess.
☀️ Step 3: Position for Optimal Light and Watering
Purslane loves bright, indirect light—think morning sun with afternoon shade—but can scorch in direct afternoon rays. Hang your container where it gets 4-6 hours of filtered sunlight daily, like near an east-facing window or under a 50% shade cloth if outdoors. You’ll know it’s happy when leaves stay plump and deep green, not wilted or pale. If leaves turn yellow or crispy, adjust the light immediately; purslane’s succulent nature makes it drought-tolerant but not heat-tolerant.
Water every 2-3 days until the top inch of soil feels dry—stick your finger in to check. Overwatering is the #1 killer of purslane; let the soil dry slightly between waterings. During hot spells, mist the leaves lightly in the morning to boost humidity without soggy roots. Avoid wetting the leaves at night, or fungal issues may creep in.
✂️ Step 4: Prune and Harvest for Continuous Growth
Start harvesting 3-4 weeks after planting when leaves reach 1-2 inches long. Pinch off outer leaves first, leaving the inner growth intact—this encourages bushier, more productive plants. I use clean scissors to snip just above a leaf node, always cutting at a 45-degree angle to prevent tearing. Regular harvesting prevents bolting (flowering) and keeps the plant focused on leaf production. Aim to harvest no more than ⅓ of the plant at once to avoid stress.
If your purslane starts to flower, snip off the buds immediately—flowering signals the plant to shift energy from leaves to seeds. You’ll see this as tiny yellow blooms appearing; remove them within 24 hours to prolong the harvest window. With proper care, a single hanging plant can yield enough greens for 4 salads weekly—perfect for container gardening.
🌿 Step 5: Fertilize and Overwinter for Long-Term Success
Feed your purslane every 4-6 weeks with a balanced liquid fertilizer (10-10-10) diluted to half-strength. I skip granular fertilizers—they risk burning delicate roots. After fertilizing, water deeply to rinse away any residue. Purslane is a light feeder, so over-fertilizing leads to bitter leaves. If you notice dark green, rubbery leaves, flush the soil with water to reduce salt buildup.
In cooler months, move your hanging plant to a sheltered spot where temperatures stay above 50°F. Purslane is annual in cold climates but can survive mild winters if protected. Before the first frost, harvest all remaining leaves and compost the plant—its nutrients will enrich your soil. If you’re in a warm climate, it may regrow from the roots in spring with minimal care.
Tips & tricks for thriving purslane in hanging containers
Transforming purslane into a lush, edible hanging garden takes just a few strategic moves—here's what I've learned after years of growing this resilient succulent.
Soil Mix Secret: The 2:1 ratio of potting soil to perlite or coarse sand is non-negotiable for purslane's delicate roots. I've found that adding a handful of worm castings to the mix boosts early growth without risking over-fertilization. This creates a perfect balance of moisture retention and drainage that mimics purslane's native desert conditions. The key is to avoid compacting the soil when filling your container—gently tapping the sides creates the ideal aeration without creating pockets that trap moisture.
Light Positioning: Those 4-6 hours of filtered sunlight are critical, but placement makes all the difference. I've noticed that east-facing windows provide perfect morning light without the harsh afternoon sun that can scorch purslane's tender leaves. If you're using a 50% shade cloth outdoors, position it to block the most intense midday rays while still allowing plenty of bright, indirect light. Watch for leaves that develop yellow or crispy edges—they're screaming for better light conditions.
Watering Wisdom: The "top inch dry" rule is your best friend, but timing matters just as much. I water my hanging purslane containers in the morning so any excess moisture evaporates during the day rather than sitting on the roots overnight. During summer heatwaves, I've found that misting the leaves lightly in the morning helps maintain humidity without creating the soggy conditions that lead to root rot. Remember, purslane's succulent nature means it's better to underwater slightly than to overdo it.
Harvesting Technique: When you're ready to harvest those 1-2 inch leaves after 3-4 weeks, use clean scissors and always cut at a 45-degree angle just above a leaf node. This precise cutting method prevents tearing and encourages new growth from that exact spot. I've learned that harvesting no more than one-third of the plant at a time prevents stress and keeps your purslane producing continuously. The moment you see those tiny yellow blooms appear, snip them off immediately—they'll steal energy from your leaf production.
Pro Tips for Purslane Hanging Plant
- Transforming purslane into a lush, edible hanging garden takes just a few strategic moves—here's what I've learned after years of growing this resilient succulent.
- Soil Mix Secret: The 2:1 ratio of potting soil to perlite or coarse sand is non-negotiable for purslane's delicate roots.
- Light Positioning: Those 4-6 hours of filtered sunlight are critical, but placement makes all the difference.
Frequently asked questions
How often should I water my hanging purslane plant?
Water your purslane only when the top inch of soil feels dry—about once a week in warm weather or more frequently if it’s extremely hot. Hanging pots dry out faster, so check daily during heatwaves. Overwatering is the #1 killer—let excess water drain completely to prevent root rot.
When is the best time to harvest purslane leaves?
Harvest young, tender leaves anytime after 4–6 weeks of growth, but before flowers appear for the mildest flavor. Use clean scissors or pinch stems just above a leaf node. Regular harvesting encourages bushier growth—aim for 2–3 leaves per stem to keep your plant productive.
Can I grow purslane in a regular pot instead of a hanging one?
Purslane thrives in containers 6+ inches deep, but hanging pots prevent soil-borne diseases and make harvesting easier. If using a standard pot, ensure it has drainage holes and place it in partial shade to avoid leggy growth. Just avoid overcrowding—space plants 6–8 inches apart.
What should I do if my purslane leaves turn yellow or look mushy?
Yellowing or mushy leaves usually signal overwatering or fungal issues. Let the soil dry out completely, then repot in fresh, well-draining mix. Improve airflow by trimming crowded stems and avoid wetting leaves when watering. If pests (like aphids) are present, spray with neem oil or rinse leaves with soapy water.
How do I store harvested purslane to keep it fresh?
Store purslane in a sealed container with a paper towel to absorb moisture, then refrigerate for up to 5–7 days. For longer storage, blanch leaves in boiling water for 30 seconds, then freeze in ice cube trays with olive oil. Never wash until ready to use—excess moisture speeds up spoilage!
Wrapping up and next steps
Growing purslane in a hanging plant isn’t just a creative gardening hack—it’s a delicious way to enjoy fresh, nutrient-packed greens right at home! 🌱 With the right setup, sunlight, and care, you’ll soon be harvesting vibrant, succulent leaves perfect for salads, stir-fries, or garnishes.
Whether you’re a beginner or a seasoned gardener, this edible green is a rewarding addition to your container garden.
Ready to take the next step? Start small—try a single hanging basket or expand your setup with more plants. Share your progress with fellow plant lovers, and don’t forget to experiment with recipes using your homegrown purslane. Happy growing! 🌿