
Planting
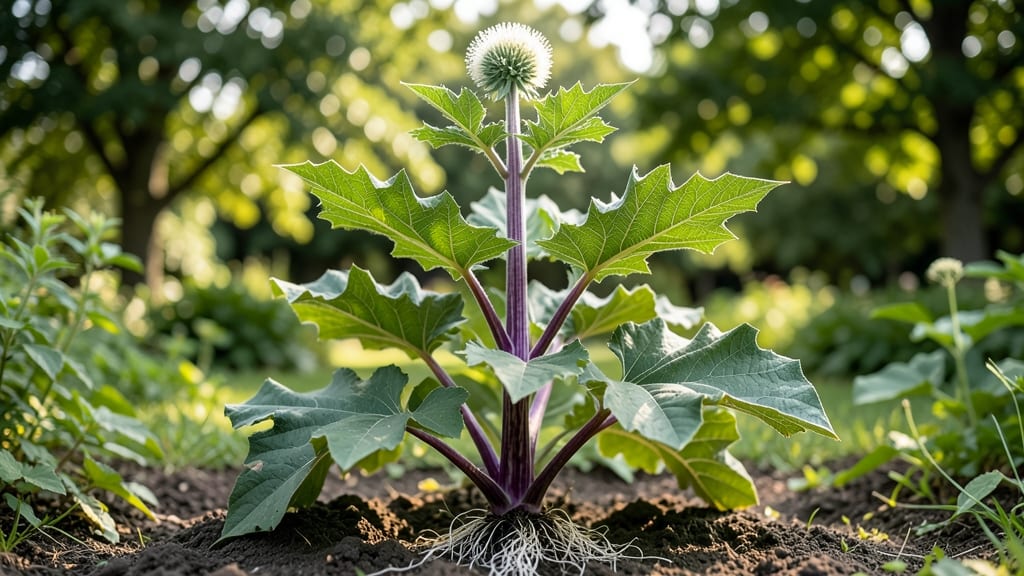
Spotting a young hogweed plant can mean the difference between a safe garden and a skin-burning hazard. 🌱 This invasive species starts small but grows into towering giants that release toxic sap—so knowing how to identify and remove it early is critical for safety and ecosystem health.
The first step is recognizing those distinctive jagged leaves and purple-streaked stems before they reach waist height.
The real danger lies in its sap, which causes severe burns and blisters when exposed to sunlight. Unlike many weeds, hogweed doesn’t respond to typical herbicides, so manual removal is your best defense.
I’ve found that pulling young plants—before they establish deep roots—is far more effective than tackling mature stalks. The key is to act fast, wear gloves, and avoid crushing the stems.
Once you’ve identified the plant, removal becomes a careful process. Use long sleeves, goggles, and disposable gloves to protect your skin, then dig out the entire root system to prevent regrowth.
Bag the plant immediately and dispose of it in sealed trash—never compost it, as the toxins persist even after death. This method keeps your yard safe and prevents accidental spread to neighboring properties.
Prevention starts with vigilance. Hogweed thrives in disturbed soils, so mulching garden beds and monitoring for new growth in spring can stop it before it takes hold.
If you’re dealing with an established patch, consider covering the area with thick cardboard or landscape fabric to block sunlight and weaken existing plants over time. The goal is to eliminate it completely—before it eliminates your peace of mind.
📚 In This Guide
- What you need
- Instructions
- Tips and common mistakes
- Wrapping up and next steps
What you need
- ● Gloves (heavy-duty, long-sleeved): 1 pair (nitrile or leather to protect against sap and skin irritation).
- ● Long-sleeved clothing & pants: 1 set (lightweight, breathable fabric to minimize skin exposure).
- ● Safety goggles: 1 pair (to shield eyes from sap splashes).
- ● Hand trowel or small garden fork: 1 (for precise digging of young sprouts).
- ● Heavy-duty trash bags (20-30 gallon): 2-3 (for disposal of removed plants).
- ● Garden shears or pruners: 1 (for cutting larger stems if needed).
- ● Spray bottle with water: 1 (to rinse gloves/tools after use).
- ● Disinfectant (rubbing alcohol or bleach solution): 1 small bottle (to clean tools post-use).
- ○ Marking flags or spray paint (optional but helpful): 5-10 flags or 1 can (to tag areas where hogweed was removed).
- ● Vinegar (20-30% acetic acid) or herbicide (glyphosate-free): 1 gallon (for spot-treatment if regrowth occurs).
- ● Garden hose with nozzle: 1 (to rinse sap off skin/clothing immediately if exposed).
- ● First-aid kit: 1 (include antihistamines and hydrocortisone cream for skin reactions).
- ● Camera or phone: 1 (to document hogweed locations for future monitoring).
Step-by-step guide to identifying and removing young hogweed plants
Here's how to spot and safely eliminate these toxic invaders before they spread.
🌱 Step 1: Learn the Visual Clues of Young Hogweed
Hogweed seedlings have deeply lobed leaves that look like tiny carrot tops—three to five leaflets with jagged edges. The stems are hairless and purple-speckled, and the plant grows in clusters rather than alone. I always check areas with disturbed soil where sunlight hits, as hogweed thrives in open, sunny spots.
Don't confuse them with wild carrot or Queen Anne's lace—hogweed leaves are much more deeply divided and lack the fine fern-like texture. The key is to act fast: young plants are easier to pull before their thick, hollow stems develop and make them nearly impossible to remove by hand.
✂️ Step 2: Gather Your Removal Tools
You'll need gloves (hogweed sap causes severe burns), long-handled tools, and a heavy-duty trash bag. I use a hula hoe for cutting roots at the soil line and a garden fork for levering out stubborn clumps. Avoid pulling by hand—you'll miss root fragments that sprout into new plants.
Wear long sleeves and pants to protect your skin from sap contact. If you're working near water, double up on precautions—hogweed thrives by streams and ponds where its seeds spread easily. Keep a spray bottle with vinegar nearby to kill any missed seedlings.
💧 Step 3: Pull or Cut at the Right Time
Remove hogweed on dry, sunny days when the soil is firm but not hard. Watering first can make the roots slippery and harder to extract completely. I dig around the base with my fork, then twist gently to loosen the root ball before pulling upward. For large patches, I cut stems at ground level with the hoe, then pull remaining roots.
Never compost hogweed—its seeds can survive the process. Instead, double-bag the plants and dispose of them in outdoor trash bins. If you're near water, check local regulations—some areas require special disposal due to ecological risks.
☀️ Step 4: Monitor and Prevent Regrowth
Check the area weekly for new sprouts—hogweed seeds can lay dormant for years. I mark treated spots with orange flags to spot new growth early. For stubborn patches, I apply corn gluten meal (a natural pre-emergent) in spring to prevent seeds from germinating.
Keep the area weed-free and mulched with wood chips to block sunlight from dormant seeds. Hogweed won't grow in dense ground cover, so I plant clover or creeping thyme in high-risk zones to outcompete it naturally.
🪴 Step 5: Clean Up After Removal
Wash your tools and clothes immediately with soap and water to remove any sap. I keep a bucket of soapy water nearby for quick cleanup. Hogweed sap causes phytophotodermatitis—a painful burn when exposed to sunlight—so I scrub my skin thoroughly after handling the plants.
Dispose of gloves and tools in the trash, not the compost. If sap touches your skin, wash with mild soap and cold water within 30 minutes to minimize irritation. Keep children and pets away from treated areas until fully cleaned up.
Tips & tricks for safely removing young hogweed plants
Real talk: Hogweed removal isn't just about pulling plants—it's about doing it right the first time. Here's what nobody tells you about making this process foolproof.
Visual Confirmation is Non-Negotiable: In Step 1, when comparing hogweed to wild carrot, focus on the leaf structure: hogweed's lobes are deeply divided with jagged edges, while wild carrot leaves have a fine, fern-like texture. I've made the mistake of mistaking Queen Anne's lace for hogweed—always check for those purple-speckled stems as your final confirmation. This one visual detail prevents years of regrowth headaches.
Tool Selection Makes All the Difference: The instructions mention gloves and long-handled tools, but here's what I learned the hard way: never use a trowel—it's too small to cut roots properly. I now keep a hula hoe and garden fork as my core tools, but I've also added a dandelion digger to my kit for stubborn root fragments. The key is having tools that let you cut roots cleanly at the soil line without leaving any pieces behind.
Timing Your Removal is Critical: The instructions specify dry, sunny days, but I've found that morning removal works best—the soil is firm but still workable, and you avoid the midday heat that can make sap more aggressive. I also time my removal for at least 30 minutes after watering (if needed) to let excess moisture evaporate. This small window makes all the difference in getting clean pulls.
Disposal is Where Most People Fail: Double-bagging is essential, but here's the part nobody emphasizes: seal the outer bag with duct tape before putting it in your trash bin. I've seen too many cases where bags tear and seeds spread. For extra security, I add a layer of newspaper between bags to absorb any sap that might leak. And if you're near water, check your local regulations—some areas require special hazardous waste disposal for hogweed.
Pro Tips for Hogweed Young Plant
- Real talk: Hogweed removal isn't just about pulling plants—it's about doing it right the first time.
- I've made the mistake of mistaking Queen Anne's lace for hogweed—always check for those purple-speckled stems as your final confirmation.
- Tool Selection Makes All the Difference: The instructions mention gloves and long-handled tools, but here's what I learned the hard way: never use a trowel—it's too small to cut roots properly.
Frequently asked questions
Got questions about hogweed young plants? You’re not alone—this invasive species can be tricky to spot and handle!
Here are some of the most common concerns, answered clearly so you can stay safe and informed.
How do I tell if a young hogweed plant is actually hogweed?
Young hogweed (Heracleum mantegazzianum) resembles wild carrot or Queen Anne’s lace but grows much taller (up to 14 feet!). Look for:
- Deeply lobed leaves (like giant parsley) with hairy stems.
- Purple-spotted stems (a dead giveaway!).
- No flowers yet—young plants focus on leaf growth.
Pro tip: Rub the stem—hogweed’s sap can cause severe burns when exposed to sunlight. Wear gloves and long sleeves!
When is the best time to remove young hogweed plants?
Act early in the growing season (spring to early summer) before the plant matures. Young hogweed is easier to pull by hand or dig out with a trowel. Never let it flower! A single plant can produce 2,000+ seeds—removal prevents spread.
Pro tip: Double-check with local authorities—some regions require special disposal (e.g., bagging and freezing).
What should I do if I accidentally touch hogweed sap?
Hogweed sap contains phototoxic compounds that cause burns when exposed to sunlight. If contact occurs:
- Wash the area immediately with soap and water.
- Avoid sunlight for 48 hours—cover with clothing if needed.
- Apply aloe vera or hydrocortisone cream to soothe skin.
- Seek medical help if blisters or severe pain develop.
Are there non-toxic look-alikes I can use instead of hogweed?
Hogweed has no culinary or medicinal uses—it’s purely invasive. For edible alternatives, try:
- Wild carrot (Daucus carota) (young leaves are safe to eat).
- Cultivated parsley or cilantro (similar leaf shapes, safe for cooking).
- Dandelion greens (nutritious and easy to forage).
Pro tip: Always positively ID plants using a field guide or app like iNaturalist before consuming.
How should I dispose of removed hogweed plants?
Never compost or toss hogweed in yard waste!
Instead:
- Place plants in a sealed plastic bag and dispose of them with household trash.
- Or, freeze for 1 week to kill seeds before disposal.
- Check local regulations—some areas require burning (with permits) or special drop-off sites.
Pro tip: Monitor the area for regrowth—hogweed often returns from roots or seeds.
Wrapping up and next steps
Identifying and safely removing hogweed young plants is a crucial step in protecting your garden—and yourself! 🌱 With the right tools and knowledge, you can tackle this invasive species before it becomes a bigger problem. Remember, safety first: always wear gloves and protective gear when handling sap or uprooting.
Now that you’re equipped with the know-how, take action! Start by inspecting your garden regularly, especially in early spring when young hogweed sprouts are most vulnerable. Share your progress with fellow gardeners or local plant communities—together, you can keep your green spaces thriving and hogweed-free! 🌿