
Planting
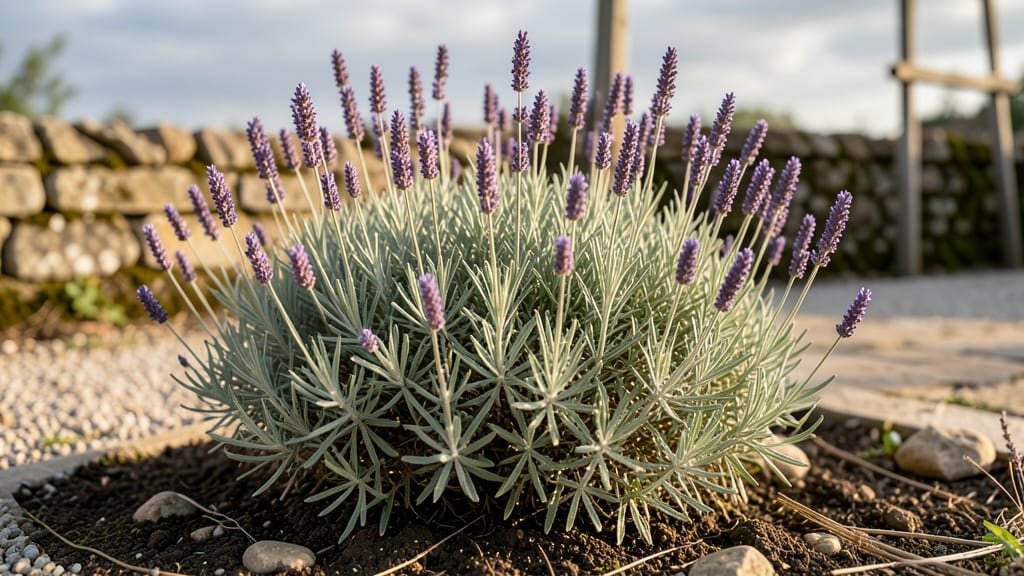
Growing lavender cone plants (Lavandula stoechas) turns any container into a fragrant purple masterpiece. 🌿 These striking shrubs with their fuzzy purple "cones" and silvery foliage are easier to grow than you'd think—once you know their three key needs.
The secret to happy lavender lies in well-draining soil and full sun (at least 6 hours daily). Most people overwater, but these Mediterranean natives prefer dry conditions—think "drought-tolerant" rather than "water-loving." I've kept mine thriving in 12-inch pots for years by mimicking their natural rocky habitat.
You'll be rewarded with fragrant spikes that bloom from early summer through fall, plus foliage that smells amazing when brushed. The cones alone make them conversation starters—perfect for patios, windowsills, or even as a striking centerpiece. Best of all, they handle pruning like champs.
A light trim after flowering keeps them compact, and you can even shape them into topiary. Here's how to get started with foolproof care!
📚 In This Guide
- What you need
- Instructions
- Tips and common mistakes
- Wrapping up and next steps
What you need
- ● Lavender cone plant (Lavandula stoechas) – 1-3 nursery-grown plants (choose healthy, compact varieties like 'Anouk' or 'Phenomenal').
- ● Well-draining potting mix – 10-15 lbs (for containers) or amend garden soil with 50% perlite, coarse sand, or gravel (for in-ground planting).
- ○ Containers (optional but ideal) – 5-7 gallon pots with drainage holes (terracotta or fabric pots work best).
- ● Gravel or pebbles – 1-2 lbs (for the bottom of containers to improve drainage).
- ○ Slow-release fertilizer – 1 lb (10-10-10 or 5-10-10 NPK ratio, optional but recommended for first planting).
- ● Pruning shears – Sharp, clean pair (sterilize with rubbing alcohol).
- ● Gloves – Gardening gloves to protect hands from prickly stems.
- ● Watering can or hose with a gentle spray nozzle – Avoid overwatering!
- ● Sunny location – 6+ hours of full sun daily (lavender hates shade!).
- ○ pH testing kit (optional) – Ideal soil pH: 6.5–7.5 (lavender prefers slightly alkaline soil).
- ○ Mulch (optional) – 1-2 inches of gravel or pebbles around the base (keeps roots cool and deters weeds).
Step-by-step guide to growing lavender cone plants in containers
Here’s how to cultivate those fragrant purple spikes—no green thumb required.
🪴 Step 1: Choose the Right Container and Drainage
Lavender cone plants despise soggy roots, so pick a container with multiple drainage holes—at least three for a 6-inch pot. Terra cotta works best because it breathes and evaporates excess moisture. If your pot lacks drainage, drill holes yourself; lavender will sulk and decline without proper airflow.
Size matters too: a 5-6 inch diameter per plant gives roots room to spread without crowding. For four plants, use a 12-inch-wide container with 6 inches of depth—this mimics their Mediterranean habitat where water drains quickly. Line the bottom with 1 inch of gravel to create a reservoir for excess water.
☀️ Step 2: Prepare Well-Draining Soil Mix
Never use regular potting soil—lavender needs fast-draining, mineral-rich mix. Combine 60% coarse sand (like horticultural-grade or play sand) with 40% premium potting mix. Add a handful of perlite or pumice to prevent compaction, which suffocates roots.
I like to mix in a slow-release fertilizer (like osmocote) at planting time—just 1 tablespoon per gallon of mix. This gives lavender a steady nutrient supply without the risk of overfeeding, which causes weak, leggy growth. Fill the pot to 1 inch below the rim, leaving room for watering.
🌱 Step 3: Plant and Water for Strong Establishment
Dig a hole twice as wide as the root ball but only as deep as the top of the root crown—burying it too deep invites rot. Gently tease apart roots if they’re circling, then place the plant so the crown sits just above soil level. This prevents water from pooling around stems.
Water deeply but sparingly right after planting—lavender hates wet feet. Use a watering can with a narrow spout to direct moisture at the base, avoiding leaves. Let the soil dry completely between waterings; you’ll see first true leaves in 2-3 weeks if conditions are right.
✂️ Step 4: Prune and Maintain for Year-Round Blooms
After the first flush of flowers fades, cut back spent spikes to ½ inch above the woody stem in early summer. This encourages a second bloom cycle and keeps the plant bushy. Avoid heavy pruning in fall—lavender needs its foliage to photosynthesize through winter.
Feed lightly in spring with ½ strength balanced fertilizer (10-10-10). Too much nitrogen produces leafy growth at the expense of flowers. Move containers to full sun (at least 6-8 hours daily)—partial shade makes lavender flop and flower poorly. Watch for white powdery mildew on leaves; this signals overwatering or poor airflow.
⏰ Step 5: Overwinter for Long-Term Success
Lavender tolerates light frosts but needs protection in harsh winters. Move containers to a sheltered spot (like against a south-facing wall) or wrap pots in burlap to insulate roots. Reduce watering in fall—dormant plants need less moisture. Resume regular care in spring when new growth appears.
Here’s the thing—lavender thrives on neglect once established. If you’ve followed these steps, your plants will reward you with fragrant purple spikes for years. The key? Drainage, sun, and patience. Skip the daily watering—lavender’s Mediterranean roots remember drought, not kindness.
Tips & tricks for perfect lavender cone plant growth
These game-changing insights will help your container-grown lavender thrive like a Mediterranean native.
Container Selection: Terra cotta isn't just traditional—it's essential. The porous material wicks away excess moisture, preventing the root rot that plagues lavender in plastic pots. If you must use plastic, choose one with at least 5 drainage holes (the instructions call for 3, but more is better). Pro tip: Elevate your pots on feet or bricks to improve airflow underneath—this prevents moisture buildup from the bottom.
Soil Mix Secrets: The 60/40 sand-to-soil ratio is non-negotiable, but here's the part nobody tells you: sterilize your sand first by baking it in the oven at 200°F for 30 minutes. This kills fungal spores that could sabotage your plants. For the premium potting mix, I recommend adding 1 part compost to the 40%—just enough to feed beneficial microbes without compacting the mix.
Watering Wisdom: The instructions say to let soil dry completely between waterings, but here's how to actually know when that is: Stick your finger 2 inches deep—if it feels dry, it's time. For the first 2-3 weeks after planting, check daily in the morning. New roots need consistent moisture to establish, but don't let water pool in saucers—empty them immediately after watering to prevent root suffocation.
Pruning Precision: When cutting back spent blooms to ½ inch above the woody stem, use sharp, clean scissors to avoid tearing. I like to make the cuts at a 45-degree angle just above a leaf node—this encourages new growth from that point. For container plants, you can get away with more aggressive pruning than garden varieties since they don't need to compete for space. Just avoid cutting into old wood, which won't regrow.
Pro Tips for Lavender Cone Plant
- These game-changing insights will help your container-grown lavender thrive like a Mediterranean native.
- Container Selection: Terra cotta isn't just traditional—it's essential.
- Soil Mix Secrets: The 60/40 sand-to-soil ratio is non-negotiable, but here's the part nobody tells you: sterilize your sand first by baking it in the oven at 200°F for 30 minutes.
Frequently asked questions
Got questions about growing your own lavender cone plant? You’re not alone!
Here are answers to the most common queries from gardeners just like you—whether you're a beginner or a seasoned green thumb looking to refine your skills.
How often should I water my lavender cone plant?
Lavender cone plants are drought-tolerant and prefer infrequent, deep watering. Water only when the top 1-2 inches of soil feel dry—usually every 1-2 weeks in warm weather. Overwatering is the #1 killer! Ensure pots have drainage holes to prevent soggy roots. Pro tip: Mulch lightly with gravel to keep moisture low.
When is the best time to prune lavender cone plants?
Prune your lavender right after flowering (late spring to early summer) to encourage bushier growth. Avoid heavy pruning in fall or winter, as new growth won’t harden off before cold weather. Use clean, sharp shears and trim just above a set of leaves—never cut into woody stems. Bonus: Pruned stems make fragrant potpourri!
Can lavender cone plants grow indoors?
Yes, but with careful conditions! Place them near a south-facing window for 6+ hours of sunlight daily. Use a terracotta pot (breathable material) and keep humidity low. If indoors, supplement with a grow light in winter. Watch for leggy growth—a sign of insufficient light. Tip: Rotate the pot weekly for even growth.
What pests should I watch for with lavender cone plants?
Lavender is generally pest-resistant, but keep an eye out for aphids (tiny green/black bugs) and spider mites (tiny webs). Treat infestations early with neem oil or a strong spray of water. Avoid chemical pesticides—they can harm beneficial pollinators. Prevention: Healthy plants (full sun, well-drained soil) deter pests naturally!
What’s a good alternative if I can’t grow lavender?
If your climate is too humid or wet, try these fragrant, drought-tolerant alternatives:
- Rosemary – Hardy, aromatic, and thrives in containers.
- Russian Sage – Purple spikes with silvery foliage.
- Catmint – Drought-resistant and bee-friendly.
- Thyme – Low-growing, fragrant, and great for borders.
Wrapping up and next steps
The lavender cone plant brings effortless beauty and soothing fragrance to your space—perfect for container gardening! Whether you’re drawn to its vibrant purple blooms or its calming scent, this low-maintenance plant is a game-changer for patios, balconies, or windowsills.
With the right care, it’ll reward you with lush growth and aromatic joy for years.
Ready to elevate your garden? Start by picking your favorite variety, gathering supplies, and following the simple steps above. Your fragrant oasis is just a pot away! 🌿✨